Two Factor Authentication
Setup Two Factor Authentication in RMS.
-
Information
-
Setup
- Add Button
Information
Two Factor Authentication requires all users to provide a second method of identity verification when they log into RMS using their username and password.
This additional layer of security on login makes it difficult for any unauthorised individual to access RMS even if they obtain a user's login credentials.
Two Factor Authentication may also be referred to as Multi-Factor Authentication or 2FA.
Activating Two Factor Authentication will require all users to connect their RMS User to their chosen authenticator application and enter the verification code to gain access to RMS.
Users with a mobile number or email address stored on their RMS User Profile can receive the verification code using this method instead.
For maximum security, Two Factor Authentication cannot be disabled once activated.

Google & Microsoft authenticator applications require Android OS Q (10) or Apple iOS 13 or later to run.

System Administrators will require Security Profile access to the Security Setup to use this feature.
-
Setup
- Add Button
Setup
Two Factor Authentication will change the login requirements for all users accessing RMS.
Ensure to complete each step before continuing through the setup process for optimal results.
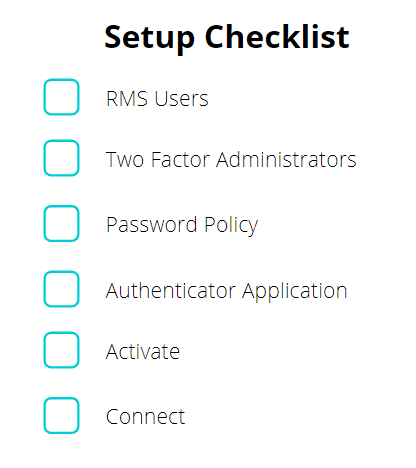

Visit our Quick Start Guide to skip straight to activating Two Factor Authentication in RMS.
-
Step 1 - RMS Users
- Add Button
Step 1 - RMS Users
Complete a User Review to audit the current active users in RMS.
Each staff member requiring access to RMS should be setup as an individual user with their own contact information and a complex password.
Regularly reviewing the active users in RMS ensures that former employees or unauthorised users are not able to access the RMS database.
Any user identified that should not have access to RMS should be set as an Inactive User.
Setting a user to 'Inactive' maintains the audit trails throughout RMS for any actions that user may have performed.
Complete the User Review before continuing.

-
Step 2 - Two Factor Administrators
- Add Button
Step 2 - Two Factor Administrators
Two Factor Administrators are users in RMS with Security Profile access to generate backup verification codes for other users.
It is recommended to have at least one Two Factor Administrator that users can easily contact in the event they are unable to use their authentication device for any reason.

Users nominated as the Two Factor Administrators will require Security Profile access to Two Factor Administration and User Profiles.
Setup atleast one Two Factor Administrator before continuing.

-
Step 3 - Password Policy
- Add Button
Step 3 - Password Policy
The Password Policy setup in RMS determines the level of complexity a user password must have.
Setup options include the minimum number and type of characters used, how frequently user passwords expire and the maximum number of attempts a user can make on login.
It is important to include guidelines for users on creating strong user passwords.
All users will be prompted to change their password once the Password Policy has been updated.

Strengthen passwords by not using personal information such as names, dates or favourite things.
Keep passwords safe by not writing them down or sharing them with other people.
Protect all accounts by not using the same password for multiple applications.
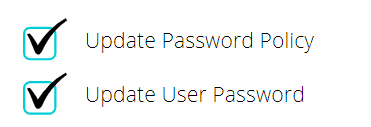
Update the Password Policy in RMS before continuing.
-
Step 4 - Authenticator Application
- Add Button
Step 4 - Authenticator Application
Authenticator applications provide individuals with a secure method of retrieving identity verification codes that can be used anywhere Two Factor Authentication is enabled.
All users will require an authenticator application installed on their mobile device or a private email address to receive the verification codes that will be used to log into RMS.

Sharing the device or email used to receive verification codes creates the same vulnerabilities as sharing a username and password.
Users who do not currently have an authenticator application on their mobile device can visit the App Store on their device and install the Google Authenticator for Apple or Android, Microsoft Authenticator, Authy or OTP Auth app.


Verification codes are unique to each RMS user and each property within the RMS database.
Users with access to multiple properties will see a verification code entry for each property in RMS once they have connected their Authenticator app of choice to their RMS User.

Google & Microsoft authenticator applications require Android OS Q (10) or Apple iOS 13 or later to run.
Refer to your device's user guide for instructions to check the operating system version being used.
Users with devices unable to run the latest operating system may consider Authy or Email Verification for Two Factor Authentication.
Ensure all users have an email address or install an authenticator application before continuing.

-
Step 5 - Activation
- Add Button
Step 5 - Activation
Activating Two Factor Authentication in RMS will require all users to connect their RMS User to their chosen authenticator application or enter an email verification code the next time they log in.
A recovery mobile number can be setup when activating Two Factor Authentication to receive any generated backup codes in the event a user is unable to access the device used for their verification codes.

Activating Two Factor Authentication without reviewing the users that can access your RMS database enables unauthorised persons with existing user credentials to continue accessing RMS.
Complete Steps 1-4 in this guide before continuing.
-
Activate Two Factor Authentication
- Add Button
Setup
Have your System Administrator complete the following.
- Go to Setup > Security in RMS.
- Navigate to the 'Two Factor Authentication' tab.
- Select the checkbox 'Enable Two Factor Authentication'.
- Enter a Recovery Mobile Phone Number.
- Save.
- Exit.
- Log out of RMS.
-
Guide
-
Step 6 - Connect
- Add Button
Guide
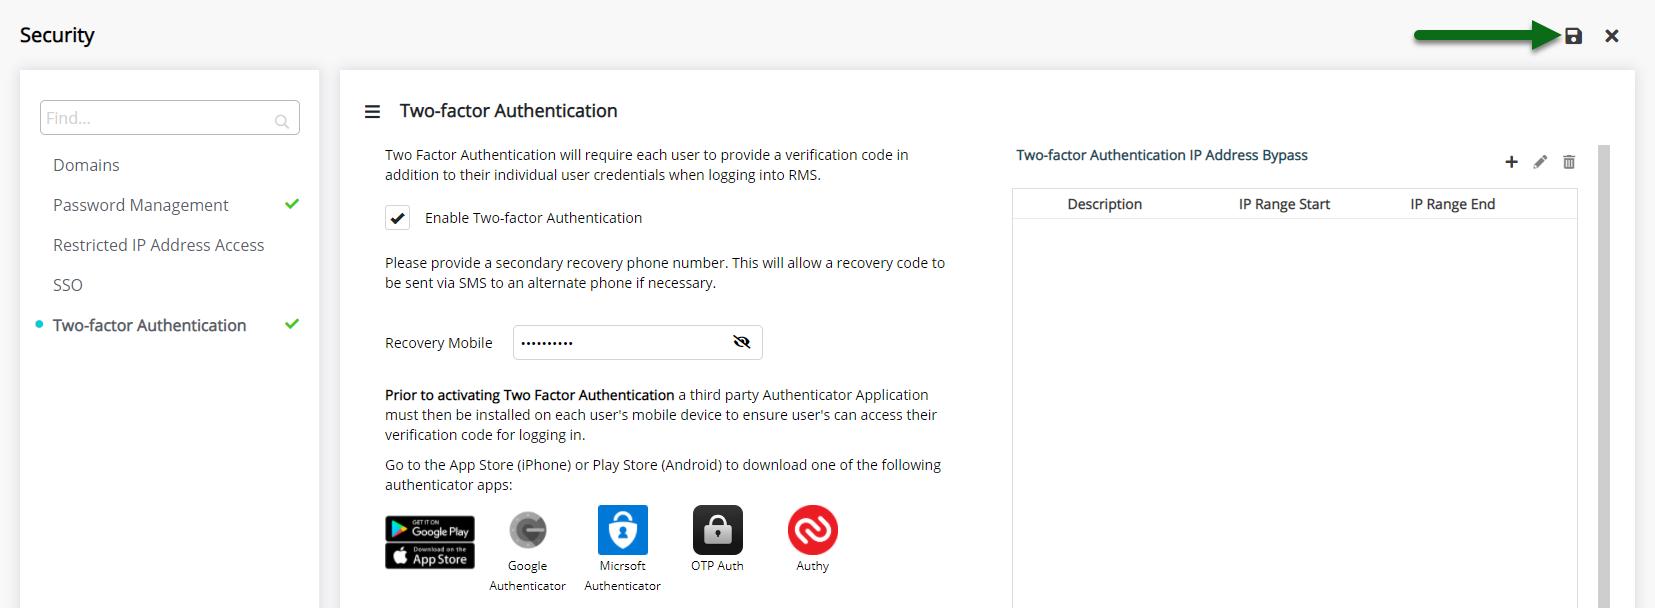
Go to Setup > Security in RMS.

Navigate to the 'Two Factor Authentication' tab.
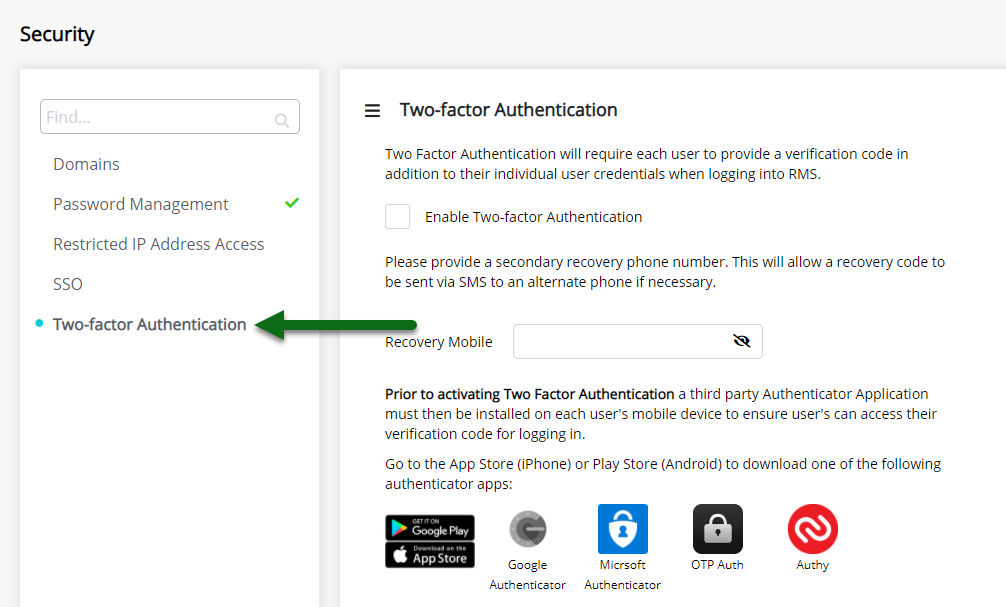
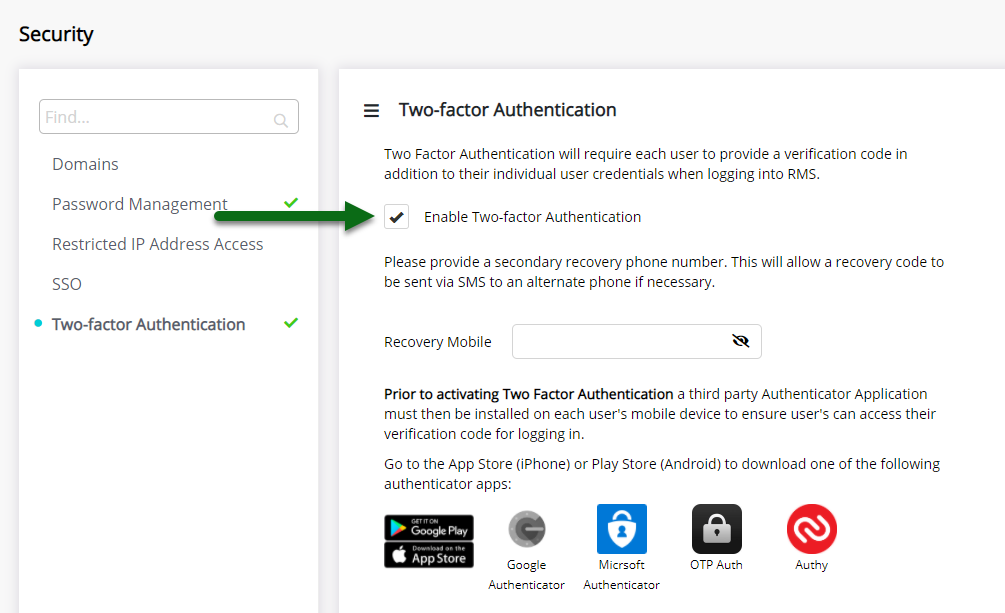
Select the checkbox 'Enable Two Factor Authentication'.
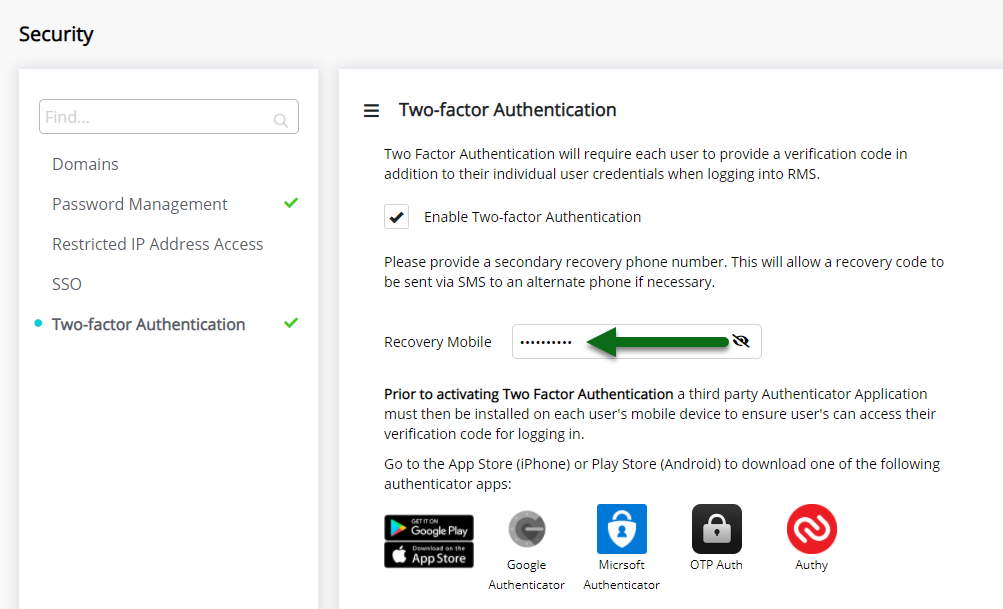
Enter a Recovery Mobile Phone Number.
Select 'Save' to store the changes made and 'Exit' to leave Security setup.
Log out of RMS.

All users will be required to connect their RMS user to their chosen authenticator application on the next login.
-
Step 6 - Connect
- Add Button
Step 6 - Connect
The first time a user logs into RMS after Two Factor Authentication has been activated they will need to connect their chosen authenticator application to their RMS user.

Users who have not updated their password and are currently absent should be temporarily set to 'Inactive' to prevent unauthorised persons obtaining and using their credentials to configure Two Factor Authentication during the user's absence.

-
Connect
- Add Button
Connect
- Log into RMS.
- Open the Authenticator Application.
- Scan the QR Code.
- Enter the Verification Code.
- Login.
-
Guide
- Add Button
Guide
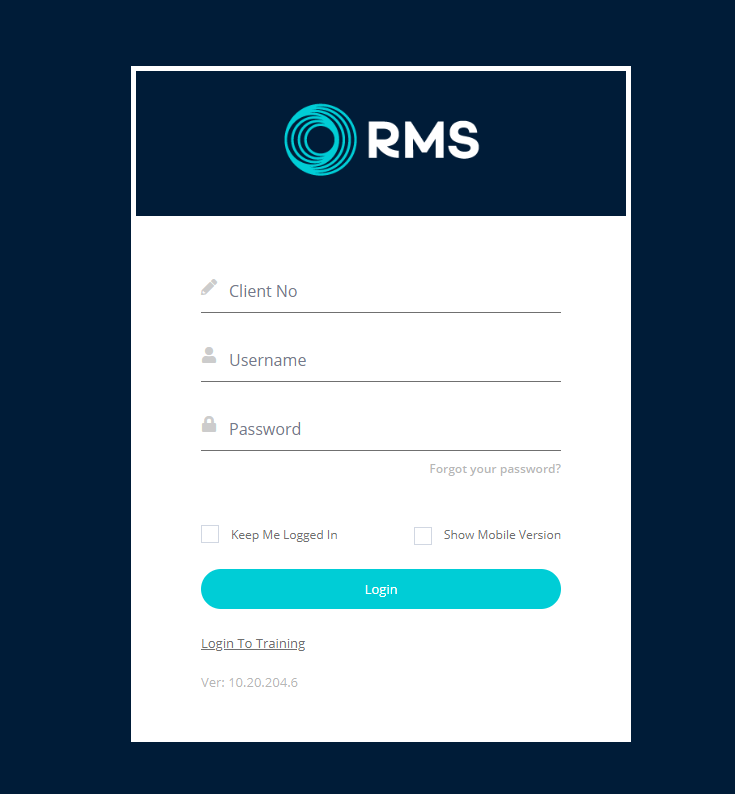
Log into RMS.
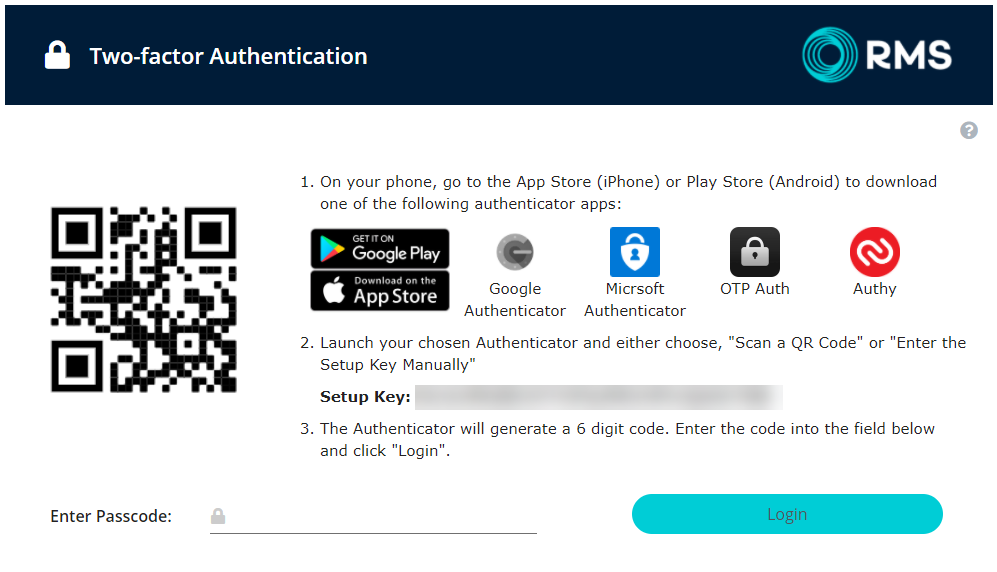
Open the Authenticator Application and scan the QR Code.
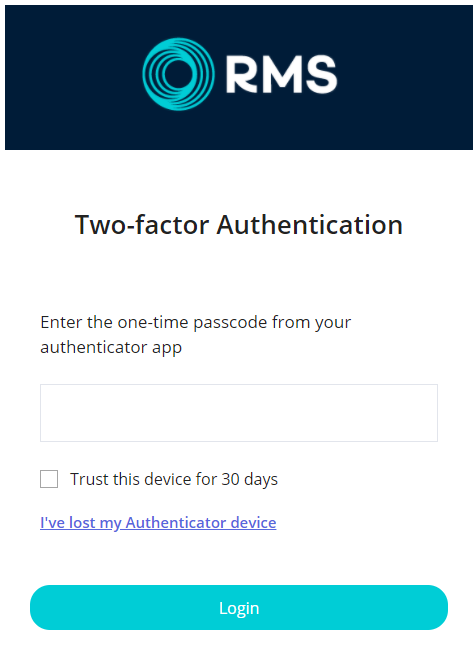
Enter the Verification Code.
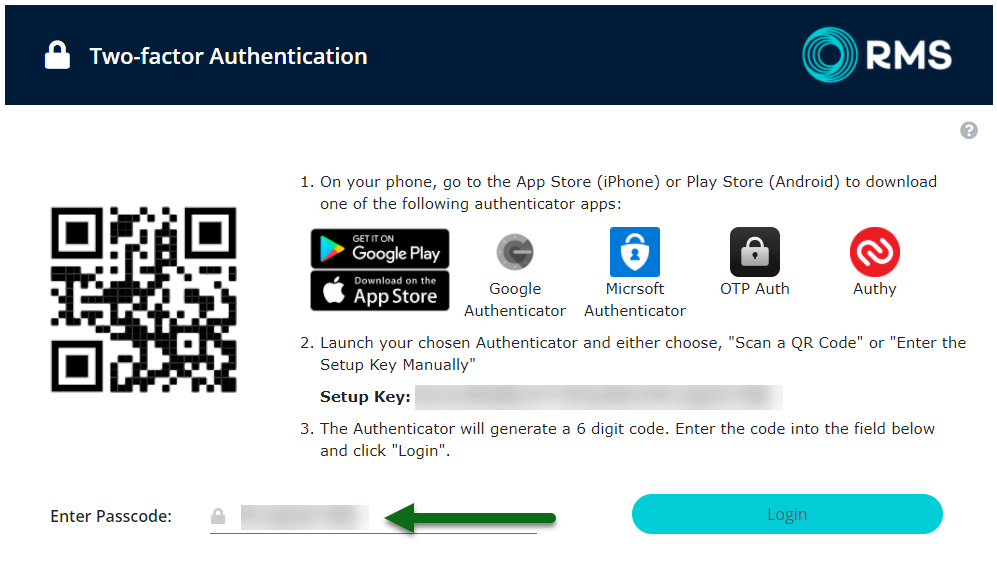
Select 'Login' to access RMS.
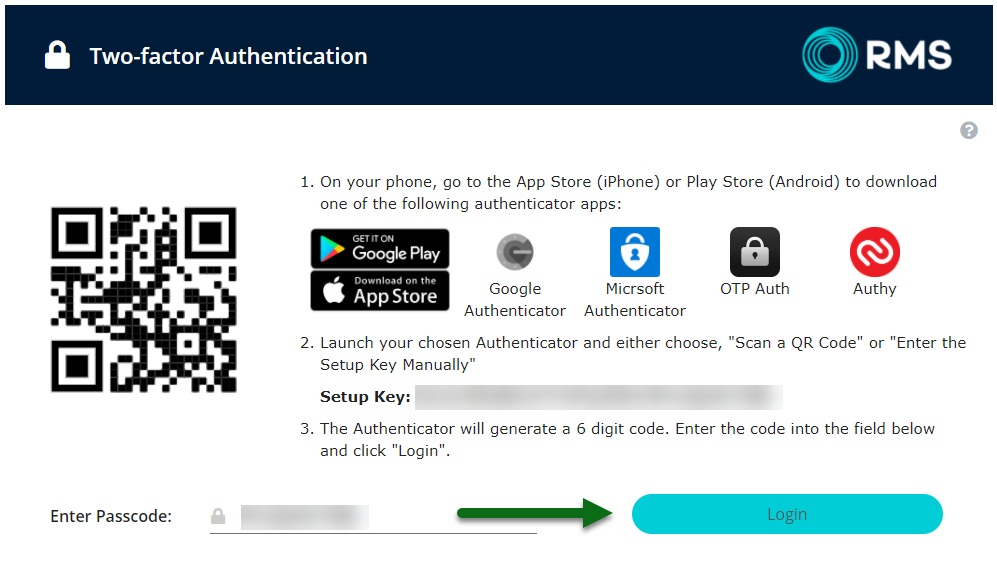
This user will now be connected to the authenticator application and can enter the code provided in the connected app when they log into RMS.
Step 6 - Connect
The first time a user logs into RMS after Two Factor Authentication has been activated they will need to connect their chosen authenticator application to their RMS user.

Users who have not updated their password and are currently absent should be temporarily set to 'Inactive' to prevent unauthorised persons obtaining and using their credentials to configure Two Factor Authentication during the user's absence.

-
Connect
- Add Button
Connect
- Log into RMS.
- Open the Authenticator Application.
- Scan the QR Code.
- Enter the Verification Code.
- Login.
-
Guide
- Add Button
Guide
Log into RMS.

Open the Authenticator Application and scan the QR Code.

Enter the Verification Code.

Select 'Login' to access RMS.

This user will now be connected to the authenticator application and can enter the code provided in the connected app when they log into RMS.

Setup
Two Factor Authentication will change the login requirements for all users accessing RMS.
Ensure to complete each step before continuing through the setup process for optimal results.


Visit our Quick Start Guide to skip straight to activating Two Factor Authentication in RMS.
-
Step 1 - RMS Users
- Add Button
Step 1 - RMS Users
Complete a User Review to audit the current active users in RMS.
Each staff member requiring access to RMS should be setup as an individual user with their own contact information and a complex password.
Regularly reviewing the active users in RMS ensures that former employees or unauthorised users are not able to access the RMS database.
Any user identified that should not have access to RMS should be set as an Inactive User.
Setting a user to 'Inactive' maintains the audit trails throughout RMS for any actions that user may have performed.
Complete the User Review before continuing.

-
Step 2 - Two Factor Administrators
- Add Button
Step 2 - Two Factor Administrators
Two Factor Administrators are users in RMS with Security Profile access to generate backup verification codes for other users.
It is recommended to have at least one Two Factor Administrator that users can easily contact in the event they are unable to use their authentication device for any reason.

Users nominated as the Two Factor Administrators will require Security Profile access to Two Factor Administration and User Profiles.
Setup atleast one Two Factor Administrator before continuing.

-
Step 3 - Password Policy
- Add Button
Step 3 - Password Policy
The Password Policy setup in RMS determines the level of complexity a user password must have.
Setup options include the minimum number and type of characters used, how frequently user passwords expire and the maximum number of attempts a user can make on login.
It is important to include guidelines for users on creating strong user passwords.
All users will be prompted to change their password once the Password Policy has been updated.

Strengthen passwords by not using personal information such as names, dates or favourite things.
Keep passwords safe by not writing them down or sharing them with other people.
Protect all accounts by not using the same password for multiple applications.
Update the Password Policy in RMS before continuing.

-
Step 4 - Authenticator Application
- Add Button
Step 4 - Authenticator Application
Authenticator applications provide individuals with a secure method of retrieving identity verification codes that can be used anywhere Two Factor Authentication is enabled.
All users will require an authenticator application installed on their mobile device or a private email address to receive the verification codes that will be used to log into RMS.

Sharing the device or email used to receive verification codes creates the same vulnerabilities as sharing a username and password.
Users who do not currently have an authenticator application on their mobile device can visit the App Store on their device and install the Google Authenticator for Apple or Android, Microsoft Authenticator, Authy or OTP Auth app.


Verification codes are unique to each RMS user and each property within the RMS database.
Users with access to multiple properties will see a verification code entry for each property in RMS once they have connected their Authenticator app of choice to their RMS User.

Google & Microsoft authenticator applications require Android OS Q (10) or Apple iOS 13 or later to run.
Refer to your device's user guide for instructions to check the operating system version being used.
Users with devices unable to run the latest operating system may consider Authy or Email Verification for Two Factor Authentication.
Ensure all users have an email address or install an authenticator application before continuing.

-
Step 5 - Activation
- Add Button
Step 5 - Activation
Activating Two Factor Authentication in RMS will require all users to connect their RMS User to their chosen authenticator application or enter an email verification code the next time they log in.
A recovery mobile number can be setup when activating Two Factor Authentication to receive any generated backup codes in the event a user is unable to access the device used for their verification codes.

Activating Two Factor Authentication without reviewing the users that can access your RMS database enables unauthorised persons with existing user credentials to continue accessing RMS.
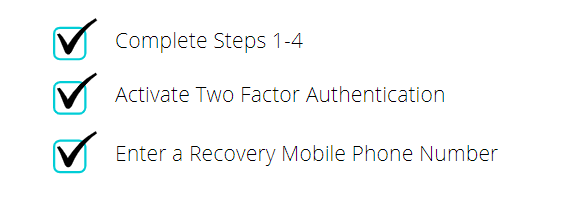
Complete Steps 1-4 in this guide before continuing.
-
Activate Two Factor Authentication
- Add Button
Setup
Have your System Administrator complete the following.
- Go to Setup > Security in RMS.
- Navigate to the 'Two Factor Authentication' tab.
- Select the checkbox 'Enable Two Factor Authentication'.
- Enter a Recovery Mobile Phone Number.
- Save.
- Exit.
- Log out of RMS.
-
Guide
-
Step 6 - Connect
- Add Button
Guide
Go to Setup > Security in RMS.

Navigate to the 'Two Factor Authentication' tab.

Select the checkbox 'Enable Two Factor Authentication'.

Enter a Recovery Mobile Phone Number.

Select 'Save' to store the changes made and 'Exit' to leave Security setup.

Log out of RMS.

All users will be required to connect their RMS user to their chosen authenticator application on the next login.
-
Step 6 - Connect
- Add Button
Step 6 - Connect
The first time a user logs into RMS after Two Factor Authentication has been activated they will need to connect their chosen authenticator application to their RMS user.

Users who have not updated their password and are currently absent should be temporarily set to 'Inactive' to prevent unauthorised persons obtaining and using their credentials to configure Two Factor Authentication during the user's absence.

-
Connect
- Add Button
Connect
- Log into RMS.
- Open the Authenticator Application.
- Scan the QR Code.
- Enter the Verification Code.
- Login.
-
Guide
- Add Button
Guide
Log into RMS.

Open the Authenticator Application and scan the QR Code.

Enter the Verification Code.

Select 'Login' to access RMS.

This user will now be connected to the authenticator application and can enter the code provided in the connected app when they log into RMS.

Step 6 - Connect
The first time a user logs into RMS after Two Factor Authentication has been activated they will need to connect their chosen authenticator application to their RMS user.

Users who have not updated their password and are currently absent should be temporarily set to 'Inactive' to prevent unauthorised persons obtaining and using their credentials to configure Two Factor Authentication during the user's absence.

-
Connect
- Add Button
Connect
- Log into RMS.
- Open the Authenticator Application.
- Scan the QR Code.
- Enter the Verification Code.
- Login.
-
Guide
- Add Button
Guide
Log into RMS.

Open the Authenticator Application and scan the QR Code.

Enter the Verification Code.

Select 'Login' to access RMS.

This user will now be connected to the authenticator application and can enter the code provided in the connected app when they log into RMS.
